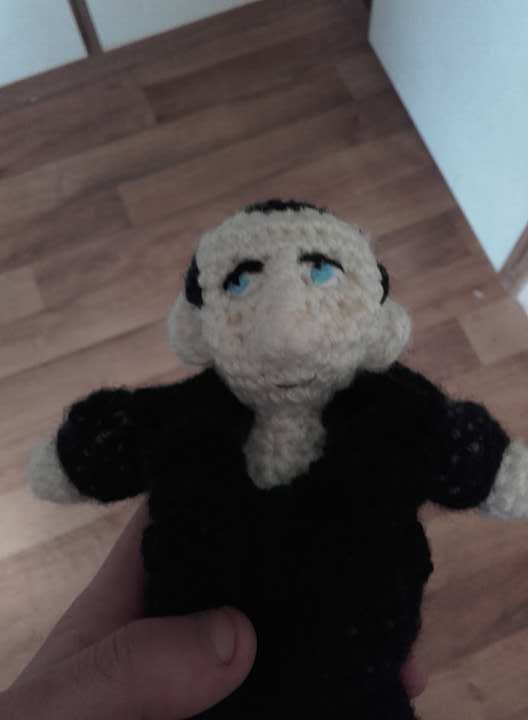
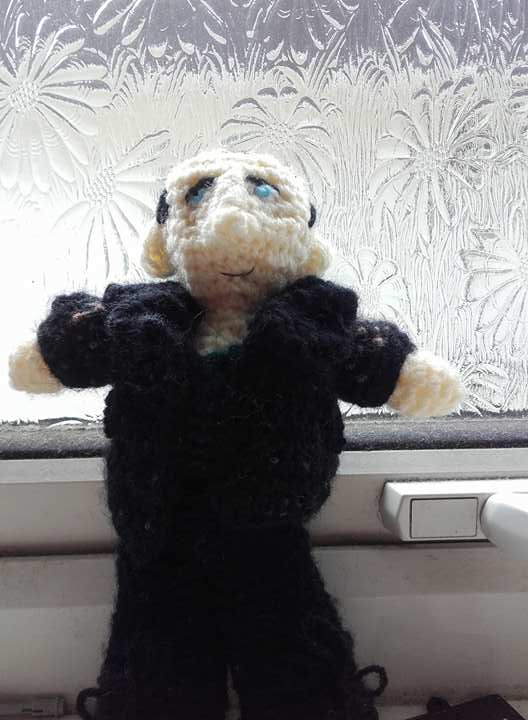
This pattern is quite similar to my Little Animals patterns (found here), and thus the clothes made for this doll should fit onto any animals you make using those other patterns (although they may be a little baggy, as the arms and legs of this doll are slightly larger.)

Please be aware that any finished products shouldn't be sold as Doctor Who is copyrighted by the BBC, but any personal use for them is perfectly fine :)
Difficulty:

Medium
You will need:
- 2.5mm crochet hook
- 2mm crochet hook
- dk yarn in cream/ peach, dark brown
- 4ply yarn in brown/ blue, white,
- Darning needle for sewing up
- Toy stuffing
For the head and body (starting from the base):
With red make a magic loop with 6sc
Round 1: 2sc in each st (12sc)
Round 2: sc in the first st, 2sc in the next st, rep to end (18sc)
Round 3: sc in the first 2 sts, 2sc in the next st, rep to end. ch1, turn (24sc)
Rounds 4 - 8: (5 rounds) sc in each st (24sc)
Round 9: sc in the first 2 sts, sc2tog, rep to end (18sc)
Round 10: sc in the first st, sc2tog, rep to end (12sc)
Round 11: sc in the first st, sc2tog, rep to end (8sc)
Rounds 12 - 13: (2 rounds) switch to 2mm hook, sc in each st
Round 14: 2sc in each st (16sc)
Round 15: sc in the first 3 sts, 2sc in the next st, rep to end (20sc)
Round 16: sc in the first 4 sts, 2sc in the next st, rep to end (24sc)
Rounds 17 - 18: (2 rounds) sc in each st
Round 19: sc in the first 2 sts, sc2tog, rep to end (18sc)
Round 20: sc in the first st, sc2tog, rep to end (12sc)
Round 21: sc2tog to end (6sc)
Fasten off
For the arms (make 2):
For the legs (make 2):


fsc10

For the sleeves(make 2):
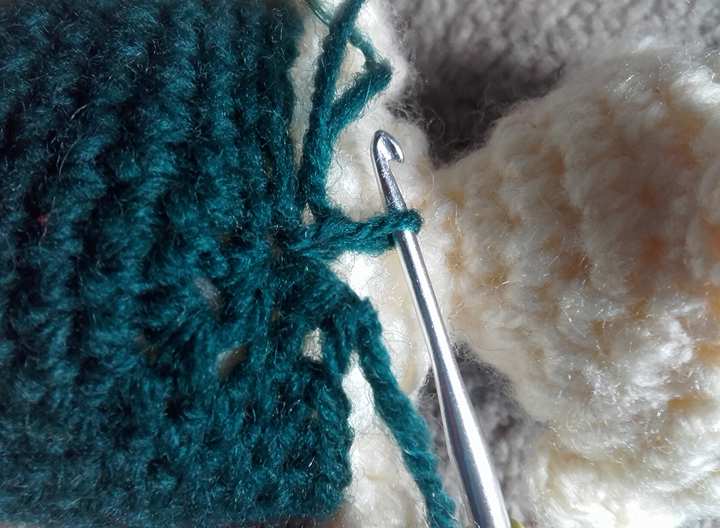
For the third collar piece:
fasten off neatly
rejoin yarn to the loop behind the back loop (see image right) of one of the stitches on this section you just fastened off from.
Rounds 4 - 5: (2 rounds) sc in each st
With red make a magic loop with 6sc
Round 1: sc in the first st, 2sc in the next st, rep to end (9sc)
Rounds 2 - 3: (2 rounds) sc in each st (9sc)
Round 4: sc in the first st, sc2tog, rep to end (6sc)
Rounds 5 - 9: (5 rounds) sc in each st (6sc)
Fasten off
For the legs (make 2):
With red make a magic loop with 6sc
Round 1: 2sc in each st (12sc)
Round 2: sc in the first 3 sts, 2cs in the next st, rep to end (15sc)
Rounds 3 - 4: (2 rounds) sc in each st (15sc)
Round 5: sc2tog 3 times, sc in the last 9 sts (12sc)
Round 6: sc in the first 2 sts, sc2tog, rep to end (9sc)
Rounds 7 - 10: (4 rounds) sc in each st (9sc)
Fasten off
For the nose:
make a magic loop with 1sc. ch1, turn
Row 1: 2sc in this st (2sc)
Row 2: sc in each st (2sc)
Row 3: sc in the first st, 2sc in the next st (3sc)
Row 4: sc3tog (1sc)
Fasten off
Sew this to the face, shaping it as you do
Fasten off
Sew this to the face, shaping it as you do
For the ears (make 2):
with 3.5mm hook ch3
make 2sc in 2nd chain st and next chain st (4sc)
Fasten off
Sew these to the sides of the head
For the hair:
Embroider the hair onto the head with medium - long straight stitches. Start with the basic shape of the hair, filling it in sparsely as you do so, then gradually add more and more hair, filling in the gaps and adding more detail as you do so.


For the eyes:
Embroider the eyes on. Embroider a white oval first, then sew a blue circle over the top of this, before sewing the pupil and eyebrows on using black yarn.

For the mouth:
Embroider the eyes on. Embroider a white oval first, then sew a blue circle over the top of this, before sewing the pupil and eyebrows on using black yarn.

For the mouth:
using regular sewing thread and a needle embroider a mouth underneath the nose
For the trousers:
with black 4ply yarn and a 2mm chrochet hook ch18
Round 1: sc in the first chain st, sc in every following chain st (this will create a loop)
Round 1: sc in the first chain st, sc in every following chain st (this will create a loop)
Rounds 2 - 8: (7 rounds) sc in each st (18sc)
Fasten off
ch18
ch18
Round 1: sc in the first chain st, sc in every following chain st (this will create a loop)
Rounds 2 - 8: (7 rounds) sc in each st (18sc)
Round 9: sc13, sc13 in the other leg, slip the first st of this round(26sc)
Round 10: sc in the same st and the next 21 sts to end (26sc)
Round 11 : sc in the first 5sts, sc2tog, sc in the next 12sts, sc2tog, sc in the last 5sts(24sts)
Rounds 12 - 15: (4 rounds) sc in each st
Fasten off
For the pullover:
ch 30
Round 1: sc in the first chain st, sc in every following chain st (this will create a loop)
Round 1: sc in the first chain st, sc in every following chain st (this will create a loop)
Rounds 2 - 7: (6 rounds) sc in each st
Round 8: (note - this is a little more than one round) sc in the first 29 sts, sc3tog (27sc)
Round 9: sc in the first 27 sts, sc3tog (25sc)
Round 10: sc in the first 25 sts, sc3tog (23sc)
Round 9: sc in the first 27 sts, sc3tog (25sc)
Round 10: sc in the first 25 sts, sc3tog (23sc)
Round 11: sc in the first 21 sts, sc2tog (22sc)
Fasten off
Rejoin to same stitch you just crocheted into

sc2tog in same and next st, sc in the next 3sts. fasten off, skip 4, then rejoin yarn to this next st. Sc in this st and the next 5sts. Fasten off, skip 4, and rejoin yarn to the next st. Sc in this st and the next st, sc2tog. Fasten off, skip to next 'section' and re-join yarn. Sc2tog with this st and the next, sc in the next 2sts, Fasten off, skip to next 'section', and re-join yarn. Sc in this st and the next 5sts. Fasten off, skip to next section, then re-join yarn. sc in this same st, sc2tog,(ch1, turn sc2)5 times to make a strap. Fasten off, skip to next 'section', then re-join yarn. Sc2tog between this same st and the next, sc in the following st,. (ch1, turn. sc2) 5 times to make the other strap. Fasten off.
Sew the straps to the opposite sides of the pullover.
Sew the straps to the opposite sides of the pullover.
For the jacket:
with a 2mm crochet hook and black yarn fsc 32
All throughout this, crochet over a length of brown yarn, so that it is sandwiched in the middle of the black jacket, but showing through slightly to give a worn-out look. Don't weorry if the edges aren't very neat as you will be crocheting over them later.
All throughout this, crochet over a length of brown yarn, so that it is sandwiched in the middle of the black jacket, but showing through slightly to give a worn-out look. Don't weorry if the edges aren't very neat as you will be crocheting over them later.

Rows 1 - 8:(8 rows) sc in each st. ch1, turn (32sc)
fasten off

fsc10
Rows 1 - 3:(3 rows) sc in each st. ch1, turn (10sc)
Row 4: slip the first st, hdc in the next st, dc in the next st, hdc in the next st, slip the following 2 sts, hdc in the next st, dc in the next st, hdc in the following st, slip the last st (10sts)
Fasten off
Attach yarn to the flat, bottom edge of this section
 |
| I've turned this section upside down |
Row 1: sc in same st (the opposite side of the fsc stitch you made) and next 3. ch1, turn
Row 2: sc2tog, sc in the next 2sts. ch1, turn
Row 3: sc in each st (3sc)
Row 4: 2sc in the first st, sc in the next 2sts (4sc)
Row 5: sc in each st
Row 6: 2sc in the first st, sc in the next 2sts, 2sc in the last st (6sc)
Row 7: 2sc in the first st, sc in the next 4sts, 2sc in the last st
rejoin to the section you previously joined your yarn on to, skipping 2sts from this last section you make


Row 1: sc in same st and next 3. ch1, turn (4sc)
Row 2: sc in the first 2sts, sc2tog. ch1, turn(3sc)
Row 3: sc in each st. ch1, turn
Row 4: sc in the fist 2sts, 2sc in the next st. ch1, turn (4sc)
Row 5: sc in each st. ch1, turn
Row 6: 2sc in the first st, sc in the next 2sts, 2sc in the last st. ch1, turn (6sc)
Row 7: 2sc in the first st, sc in the next 4sts, 2sc in the last st. ch1, turn(8sc)
sew in loose ends
sew upper section to lower section using backstitch to create a grooved look


 |
| back-stitch over where the blue line is |

For the sleeves(make 2):
ch13
Round 1: sc in the first chain st you made, sc in every following chain st (this will create a loop)
Row 2: hdc in the first 5sts, slip next st. ch1, turn
Row 3: skip slipped st, hdc in next 5sts, slip next st. ch1, turn
Rounds 4 -7: (4 rounds) sc in each st.
Row 8: slip the first st, hdc in the next 5sts , slip the following st.
fasten off
Sew these sleeves to the armholes of the jacket.
Sew these sleeves to the armholes of the jacket.
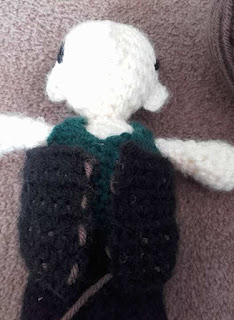
For the collar flaps:
For the first collar piece:
fsc5
fsc5
ch2, turn
dc, hdc, sc2, slip 1, ch1, turn
attach to neckline by crocheting through the edge of this and the neckline of the jacket simultaneously.

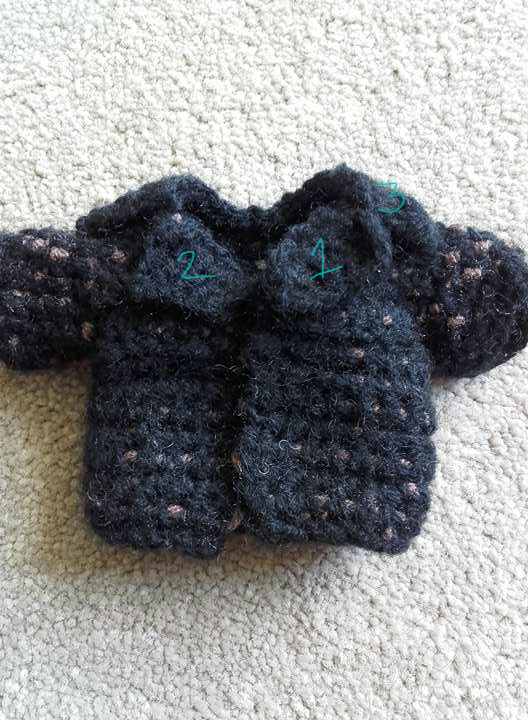 |
| image show the positioning of each collar piece |

For the second collar piece:
Fsc5, ch1, turn
Fsc5, ch1, turn
row 1: skip the first st, sc in the next 2sts, hdc, dc in the last st
attach to neckline in the same way as the first flap
For the third collar piece:
fsc22, ch1, turn
Row 1: sc2tog, sc in the next 18sts, sc2tog. Fasten off
Attach to neckline in the same way as the previous two flaps
For the pocket flaps (make 2):
fsc4
Sew these at a diagonal to the front of the jacket.
Sew these at a diagonal to the front of the jacket.
For the back straps:
fsc2. ch1, turn
Rows 1 - 10: (10 rows) sc in each st. ch1, turn
Row 11: sc2tog
fasten off
fsc2. ch1, turn
Rows 1 - 7:(7 rows) sc in each st. ch1, turn
fasten off
Sew these both to the back of the jacket, overlapping each other slightly (with the longer one on top)

To neaten the edges, use single crochet to crochet up the right front edge around the outer edge of all three collar pieces, and down the left side of the jacket.

Sew these both to the back of the jacket, overlapping each other slightly (with the longer one on top)
 |
| Image showing the positioning of the back straps. Blue marks indicate where to sew. |

To neaten the edges, use single crochet to crochet up the right front edge around the outer edge of all three collar pieces, and down the left side of the jacket.

For the shoes (make 2):
With black 4ply yarn make a magic loop with 6sc
Round 1: 2sc in each st (12sc)
Round 2: sc in the first st, 2sc in the next st, rep to end (18sc)
Round 3: sc in the first 2 sts, 2sc in the next st, rep to end. ch1, turn (24sc)
 |
| image from crochet kitten |
rejoin yarn to the loop behind the back loop (see image right) of one of the stitches on this section you just fastened off from.
Rounds 4 - 5: (2 rounds) sc in each st
Round 6(note - this is slightly less than 1 round): sc2tog 4 times, sc in the next 15sts (20sc)
Round 7: sc2tog 4 times, sc in the next 12 sts (16sc)
Rounds 8- 9: (2 rounds) sc in each st (16sc)
Fasten off
use a scrap piece of thread to 'lace up' each shoe by threading it through the occasional stitch in a zig - zag pattern
Fasten off
use a scrap piece of thread to 'lace up' each shoe by threading it through the occasional stitch in a zig - zag pattern
For the heels (make 2)(optional):
with black dk yarn make a magic loop with 3sc. ch1, turn
Round 1: 2sc in each st. ch1, turn (6sc)
Round 2: sc in the first st, 2sc in the next st, rep to end. ch1, turn (9sc)
Fasten off
Sew these to the back edge of the base of the shoe


I hope you have enjoyed this pattern; please feel free to contact me either below or on my ravelry page to tell me what you thought, along with any improvements you think could be made. Alternatively if you have any suggestions for future patterns you would like me to make I would love to hear from you.


Fasten off
Sew these to the back edge of the base of the shoe
 |
| the black circle indicates the position of the heel |

I hope you have enjoyed this pattern; please feel free to contact me either below or on my ravelry page to tell me what you thought, along with any improvements you think could be made. Alternatively if you have any suggestions for future patterns you would like me to make I would love to hear from you.
You are welcome to sell any finished products you make but I do ask that you don't re-post this pattern or claim it as your own. Thank you!


No comments:
Post a Comment